Maya Build 2013
By Fenix McKenna, for Maya
Making The Suit:
Materials:
Italian Nylon Lycra (http://seattlefabrics.com/stretch.html#Italian Nylon Lycra) color: Spanish Gold*; Under Armor Heat Gear (graphite & black, http://www.rockywoods.com/Fabrics-Kits/Under-Armour-HeatGear) , Stretchy mesh fabric (black)
*I originally wanted to use ALL under armor for this build, but rockywoods was out of stock of the gold when we went to order. The Italian Nylon Lycra was fine (it had a nice weight and color) but did start to pill after a little bit of wear. The under armor that I did use (the matte black and the grey), did not- so if you can get hold of all under armor, I would recommend that instead.
Cheapo spandex in a light color (white/nude/etc)- got mine at Joann's
various notions (zipper, thread, elastic, etc): Joann Fabrics
bodysuit pattern (I used KwikSew's unitard pattern - http://amzn.com/B000KS9CX8)
recommended equipment: A Serger (or experience working with stretchy fabric, but seriously, a serger will make your life so much easier. If you don't have a serger, I highly recommend using a stretchy thread)
Build Notes:
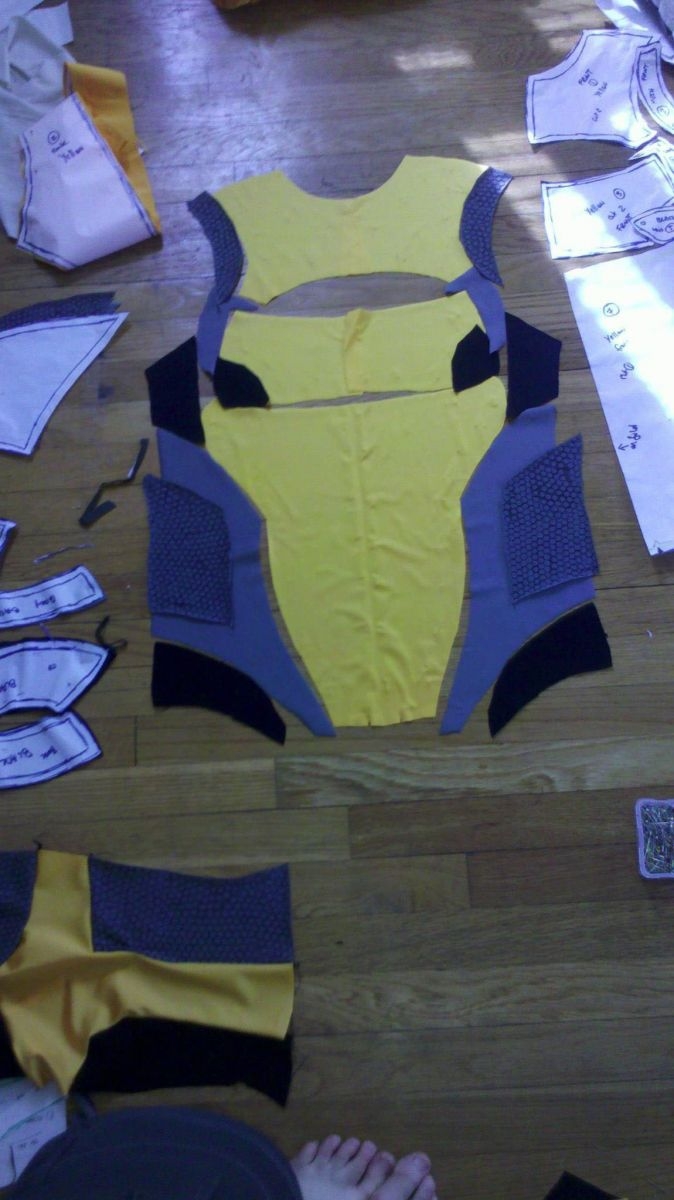
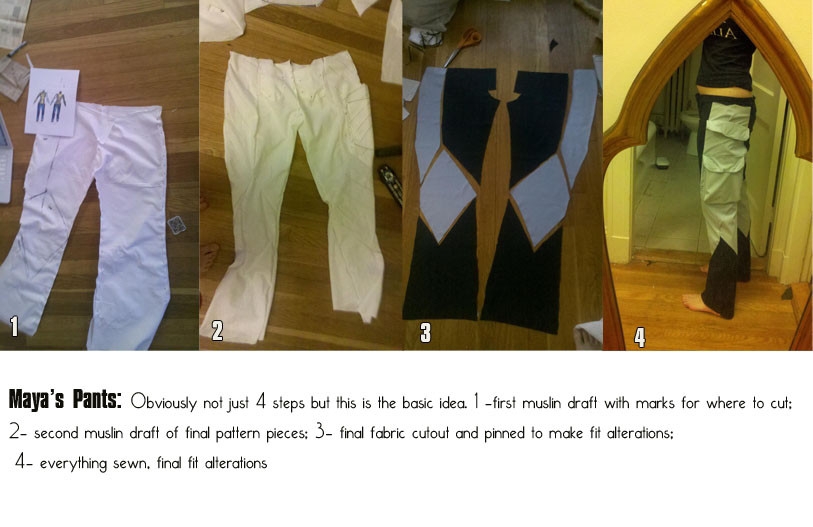
So I hadn't worked with spandex much before (except in my youth when I used to speed skate/figure skate competitively), so it was kind of scary at first. Fortunately there's a glut of information out there on what to do (and what not to do). My first thought was to edit an existing bodysuit, but I quickly realized that this would be waaaay too hard. So instead I made a test suit based on an existing pattern with my cheapo spandex. The pattern I used (Kwik Sew K2722) was actually for a unitard with shorts, but once I had it on it was easy to turn it into a leotard. It's a nice pattern because it has both side seams and a back seam, so can be easily adjusted for fit (and inserting a zipper). Then I just marked off (with a fabric pen, other sorts of pens run out of ink really quick when used on fabric- it will kill your sharpies!) the pattern of Maya's body suit. Since the Kwik Sew pattern didn't come with a sleeve pattern, I made my own sleeve block and figured it out from there (sleeves are pretty basic, and when you work with spandex, you just want to remember to make everything a little smaller than you would normally).
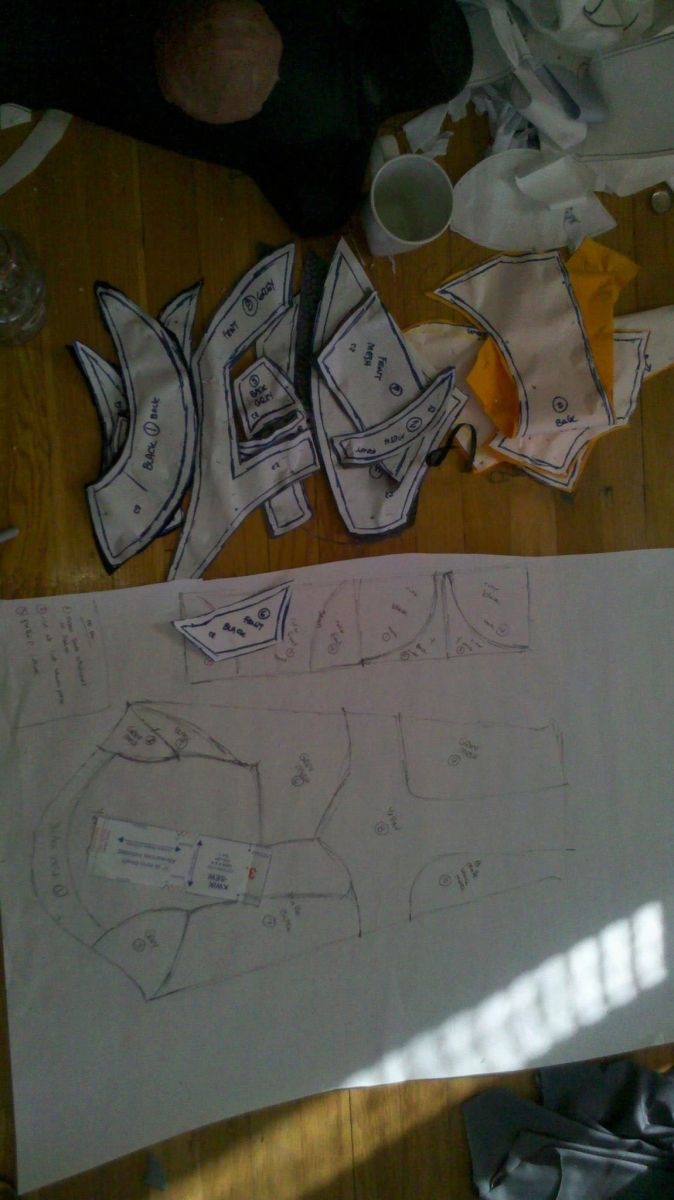
 I then took off the marked up body suit, and cut it up along the lines of the pattern (so for the KwikSew this would be in two pieces- the front and two back sections, since the front would normally be on the fold). I traced the original pattern on to butcher paper (we have a huge roll of thin white craft paper- I highly recommend this for pattern making- it is thin enough to pin, but not so thin it rips like newsprint) and then marked off the pattern for the final suit. I cut out those pieces and then re-traced them again on new paper- taking into account seam allowances and how I wanted things to line up. I made a second mock up with my cheapo spandex, just to test fit and how things lined up- made some edits and then re-cut my final pattern out of the butcher paper.
Voila! Final pattern- I made the final suit out of my final fabric, did some fit adjustments and put the zipper in. {Editorial Note: I accidentally made my suit a little too low cut- it doesn't come up as high as Maya's does, so you don't actually see my hip at all on the left side like you should. If I were to remake this suit, I'd probably change that, but it actually ended up being fairly flattering. I thought I'd accounted for it in an earlier draft, but apparently not enough. This is a good thing to keep in mind, especially when you're doing something that is in various pieces that make it harder to adjust later on down the road}
Once the suit was assembled, I put elastic into all of the open holes (the boob window, the left arm hole, both leg holes). This both prevents fraying and also helps it to hold its shape.
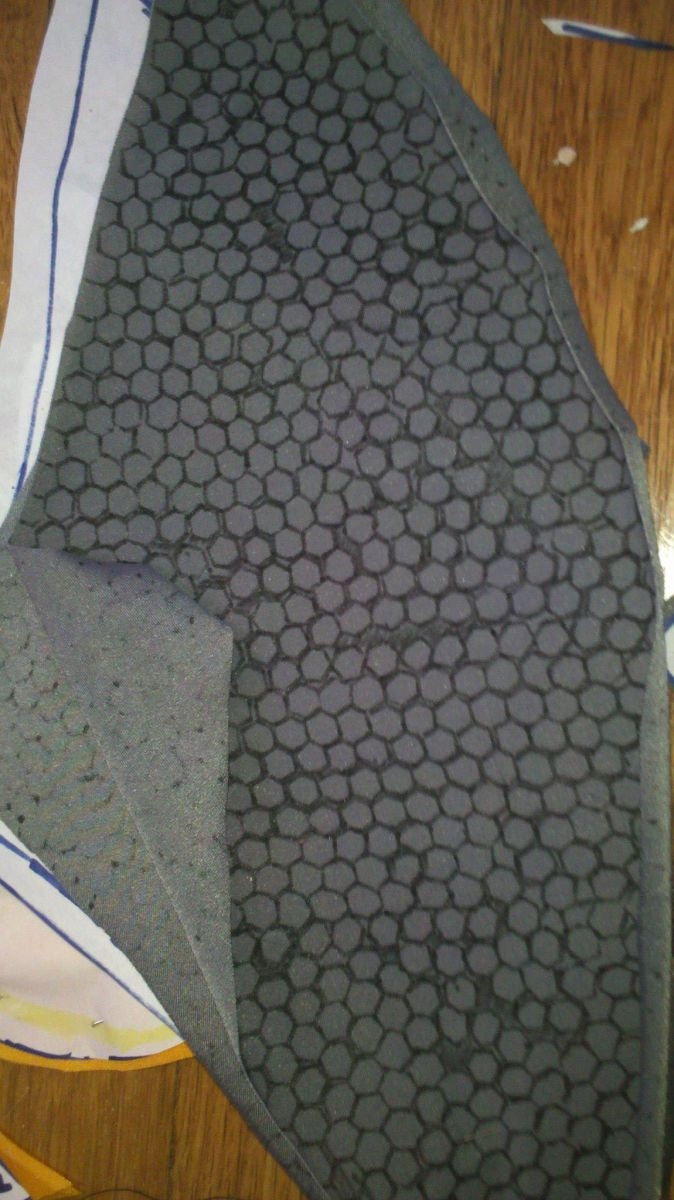
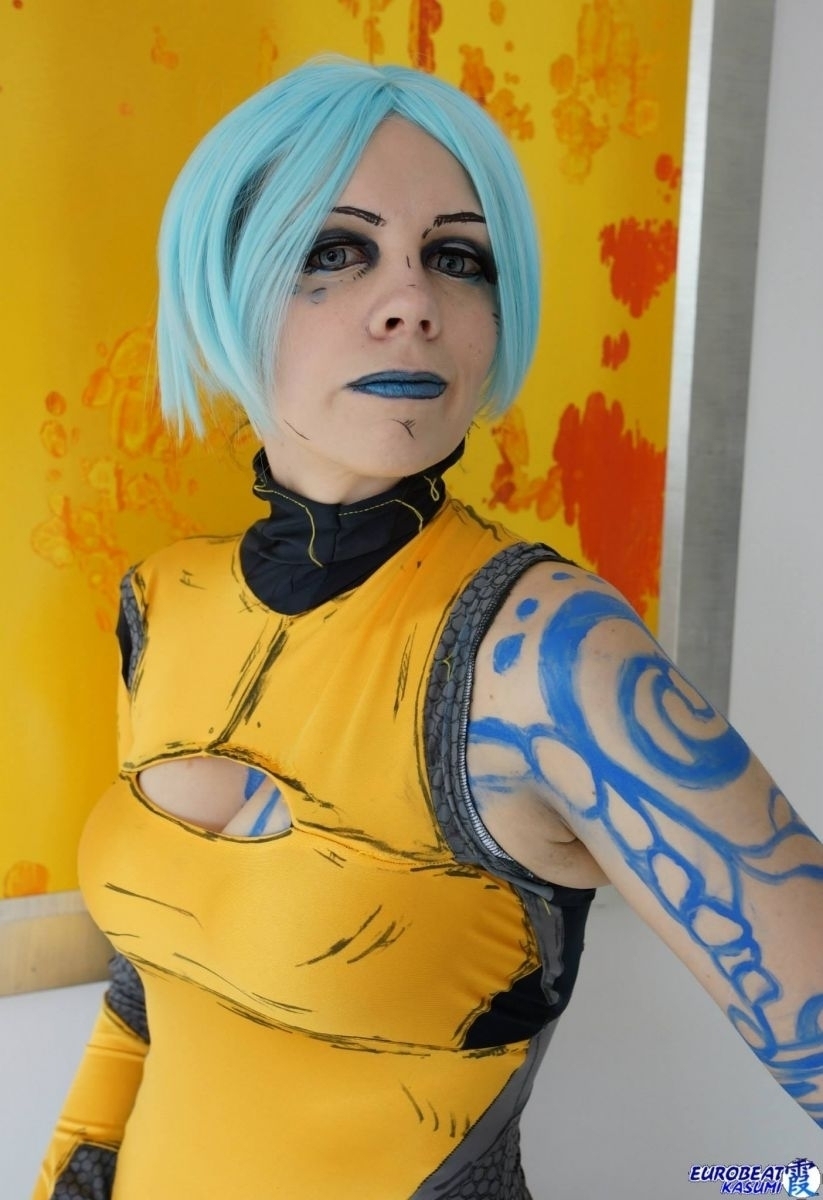
Additional Notes: For the crazy hexagonal pattern on her gray panels, I hand stenciled hexagons with a fabric marker (this took forever and a day). I  did this before assembling the final suit, because marking things on a flat surface is always easier than on a 3D one. I did wait till I had assembled the suit to add the 3D lines b/c I wanted to make sure I put them in the right spots. It's important to use a fabric MARKER and not fabric paint, because fabric paint will kill the stretch of your spandex. Buy several fabric markers, because stretchy fabric seems to eat ink rather quickly.
 did this before assembling the final suit, because marking things on a flat surface is always easier than on a 3D one. I did wait till I had assembled the suit to add the 3D lines b/c I wanted to make sure I put them in the right spots. It's important to use a fabric MARKER and not fabric paint, because fabric paint will kill the stretch of your spandex. Buy several fabric markers, because stretchy fabric seems to eat ink rather quickly.
Pants:
fabric: Dark Blue & Light Blue Poplin (moodfabrics.com)
Pattern: I used a simplicity pattern (5143) from 1972 (I found it on ebay) for "Latest Low Slung bikini jeans" and it was pretty much the best pattern I've ever used. I couldn't find what I wanted in any of the modern patterns, which is why I went retro (also maya's pants are epically low rise to the point of maybe falling off). If you can find this pattern online somewhere, I highly recommend using it.
The same basic principle that I used for the suit applies here. I cut out the pattern in muslin, sewed it up and marked off where I needed to cut. Since the pattern was from the 70's, I did have to edit it to make them more of a straight leg (and less flare). Then took apart my muslin, traced the pattern out, added seam allowance and had my final pattern. Since her pants (like her suit) are of an asymmetrical design, I kept this in mind while working on the pants.
I used snaps for the fly, because I hate zippers. I also used snaps for her pockets (yay pockets! I love cosplaying people who have pockets/bags already integrated in their design)- Josh initially used Velcro on his pockets and it was a mistake. Use snaps!
Again, used a fabric marker to add in all of the cartoon lines.
 Makeup & Wig:
The Wig I got on ebay, I ended up getting a "spike" wig and cutting it down myself.
Tattoos: I used Temptu Pro temporary Tattoo ink to manually paint in my tattoos (www.temptupro.com). They have a number of different shades of blue, so you can get whatever works for your skin tone (I happen to have paley mcpale skin, so I went with a slightly darker blue- it photographs really well and shows up at about the right color). I used "Dura Original 314: Electric Blue".
Pros:
1) It looks as real as a fake tattoo can
2) It won't rub off (even the palm of my hand and my boob window tattoos stayed on all day- I had to touch them up a little b/c these are highly sweaty areas, but still, that's impressive)
3) pretty easy to apply (I used a very small paint brush)
4) photographs really well
Cons:
1) It DOESN'T come off (I still had quite a bit of tattoo on my arm, about 2 weeks after the con. This was with vigorous scrubbing with soap and then rubbing alcohol)
Reference: For the tattoos, I largely used this image (http://windofthestars.tumblr.com/post/42233640957) for reference. I also used all of the high res photos of Maya I could find (also I found one of her back tattoos, which I can't seem to find right now, but if you want it, shoot me an email and I can send it to you). I did apply all of the tattoos myself, because I am somewhat flexible and we have the right kind of bathroom mirrors. But if you have a semi artistically talented assistant, I recommend getting help.
Lipstick: I used Ka'Oir brand lipstick, "Doll" (http://amzn.com/B005G459KQ) which you can find on amazon. I highly recommend this lipstick b/c it 1) Doesn't come off (seriously my lipstick lasted ALL day despite the fact that I ate and drank), 2) comes in a bunch of different shades of blue (so again, you can pick the one that works best for your skin tone- this one worked best for me) and 3) isn't tested on animals (yay! Cruelty free cosplay!)
Other makeup: I just used my normal makeup to simulate her "smoky eye" makeup, again this is up to you and what works with your skin type/tone. On Friday, I did wear "grey" contacts, but it honestly didn't seem to make much difference b/c my eyes are a really deep blue and it just made them slightly sparklier. I might do some more research and try to find a more opaque specialty contact for the next time I wear her, but it didn't really make a whole lot of difference (also since I need the corrective ones, it's a little more expensive for me).
I used black eyeliner to make the cartoonish lines on my face. I like "Stila" brand waterbrook eyeliner (it stays put, even in the Atlanta heat of Dragon Con)
I also wore different light grey contacts (dolly eye) when I wore this costume at D*Con 2013. I think it helped amp up the cartoony look.
I used black eyeliner to make the cartoonish lines on my face. I like "Stila" brand waterbrook eyeliner (it stays put, even in the Atlanta heat of Dragon Con)
I also wore different light grey contacts (dolly eye) when I wore this costume at D*Con 2013. I think it helped amp up the cartoony look.
Shoes:
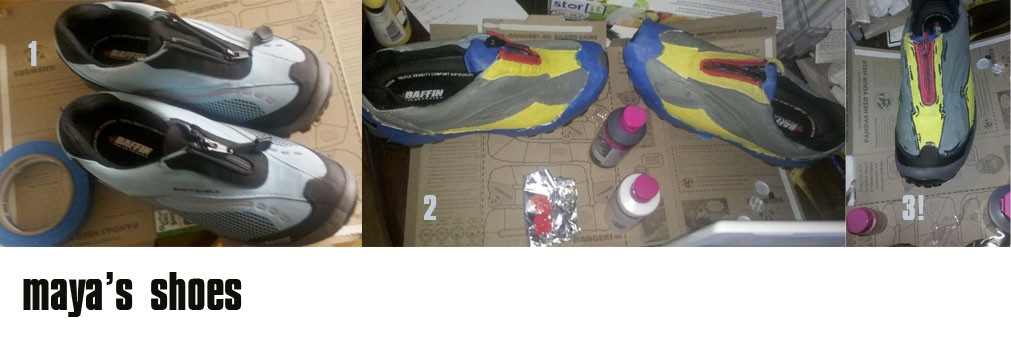
The shoes were a pain in the ass. I finally found exactly the right kind of shoes on ebay (ofc). They were originally a european hiking shoe (the Brand is "Baffin") which I then painted with fabric paint and added the cartoonish lines (again with fabric paint). I painted the first coat with white fabric paint all over because I wanted them to be a uniform color (they were originally a light blue color). Then painted over that with yellow, grey and red (in the right spots). I used black fabric paint to paint the lines in.
 Class Mod:
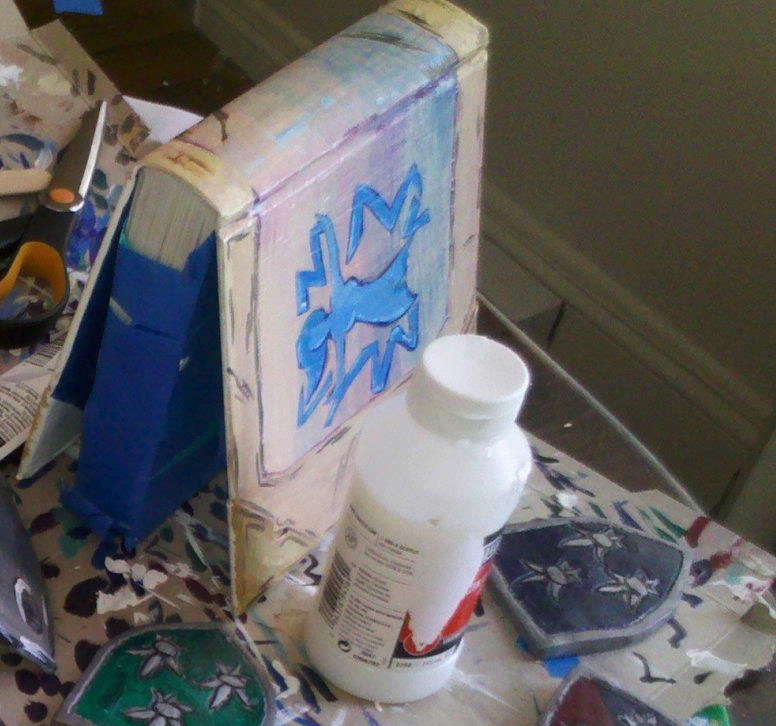
For the class mod, I used an actual book (The Little Big Book of Birds- Josh picked up both the bases for my class mod and Geralt's spell book at a second hand book stored), which I gessoed and painted/varnished myself. It looked awesome, but was also kind of heavy. It is based on the "Legendary Siren Mod" mostly because it A)looks badass and B) Was easy to find a ton of reference for.
I attached it to my belt via loops I made with leather which I riveted to the back of the book (after staining/varnishing them separately). I also added the cartoony lines to the straps b/c I'm a perfectionist. I initially had these riveted together which meant they had to be slipped off my belt. This turned out to be really annoying so for the second day of these costumes I switched them out for snaps (so much better!) It also meant I could take it off more easily and Sit down! Yay sitting!
EDIT: For Dragon Con, I ended up hollowing out the book to make it lighter. This made it slightly lighter but it was still kind of heavy for what it was (also in addition to all the other stuff I had hanging from my belt, I was still constantly pulling my pants up). If I were to do it again, I'd probably just make it out of pink insulation foam the way we made the weapons & the shields (because that stuff is a)cheap, b) easy to work with, and c)sooo much lighter than any other material)
Infinity Conglomerate & Vladof Holster:
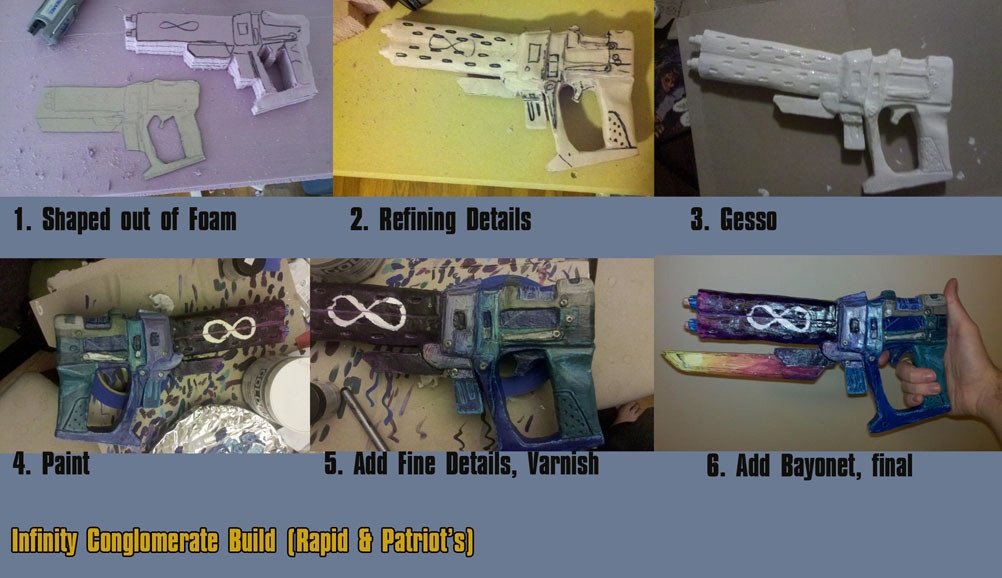
Obviously I needed a weapon, and although I'm usually a Tediore girl, I couldn't resist the sexy malevolence of the Vladof Infinity Pistols { Though I had so much fun carrying around Josh's Enormous Maliwan Sniper Rifle, that if we do these again, I think I'd like to build a Tediore Shotgun or maybe one of the exciting SMGs to carry around as well}. I liked most of the Rapid Infinity, but felt it really needed a bayonet (like the Patriot's Infinity), so we based my gun on both of those.
Materials: Pink Insulation Foam, Foamed PVC Sheet, Acrylic Gesso, Acrylic Paints (various), Satin Varnish (acrylic), Black Art Pen (0.3m)
For building both our guns, Josh formed them out of pink insulation foam (yes, the kind you get at home depot) with the dremel. Then I coated the gun with several coats of gesso and painted according to reference. We shaped the bayonet separately (out of foamed pvc), but it followed the same basic steps (shape, gesso, paint, draw lines, varnish). Once I was happy with the colors, I added in all of the lines with an art pen (copic 0.3mm black) and let that dry before adding varnish. I used a Satin varnish for both guns because we wanted them to be shiny but not super shiny. Once both parts were done, Josh hot-glued the bayonet into place (he had left a slot for it when he was shaping the gun).
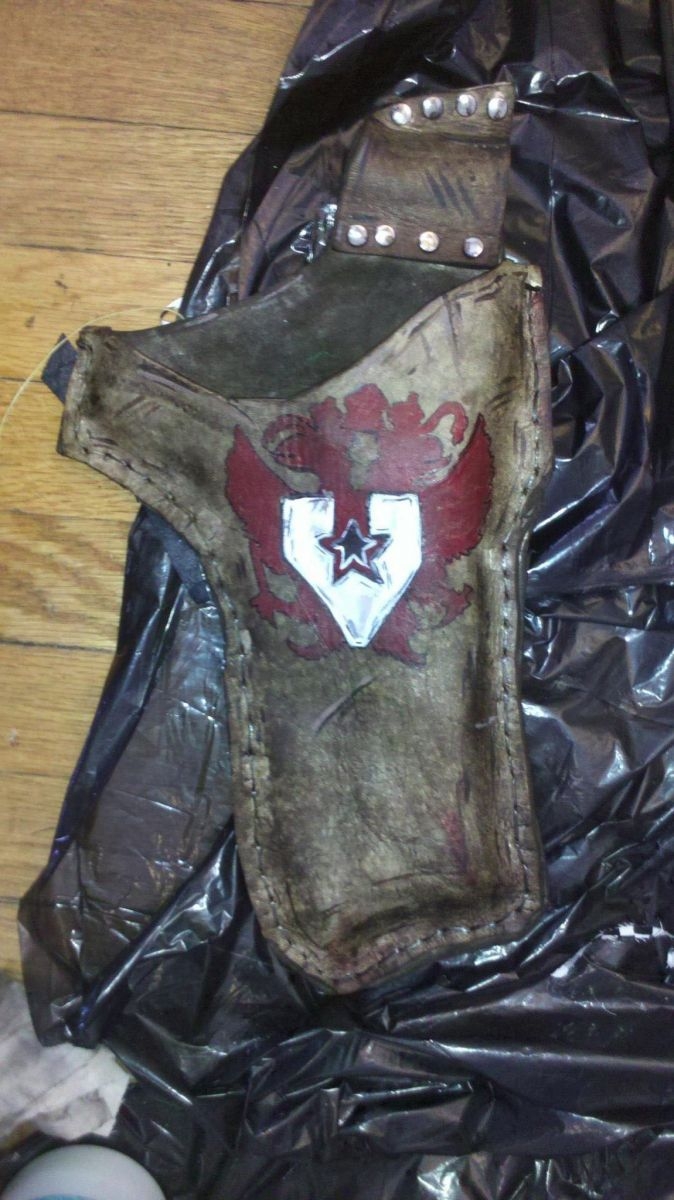 Holster
Materials: leather, rivets, leather snaps, acrylic paint, wax thread/awl/needles
Because I'm a crazy perfectionist and because it's always good to build a place to put your weapon into your costume, I had to make a Vladof holster for my infinity. Since Maya doesn't have a holster, I looked at some of the characters who do (the gunzerker mostly) to get a feel for what a BL2 holster would look like.
I cut out the pattern appropriate to my gun (there are tons of reference in so far as making holsters for guns, so I'm not going to get into it here. If anyone has specific questions, feel free to email us) and wet formed it to my gun overnight. Once it was dry and in the appropriate shape, I sewed the leather together. Then I applied one coat of stain and allowed that to dry.
I then painted the Vladof symbol in acrylics on the holster (since it is a Vladof gun). I also did a little bit of weathering/bloodstaining/cartoon lines with acrylics at this step.
Once everything was dry, I sealed it with Leather varnish. The holster attaches to my belt via snaps so it can easily come off and I can sit down!
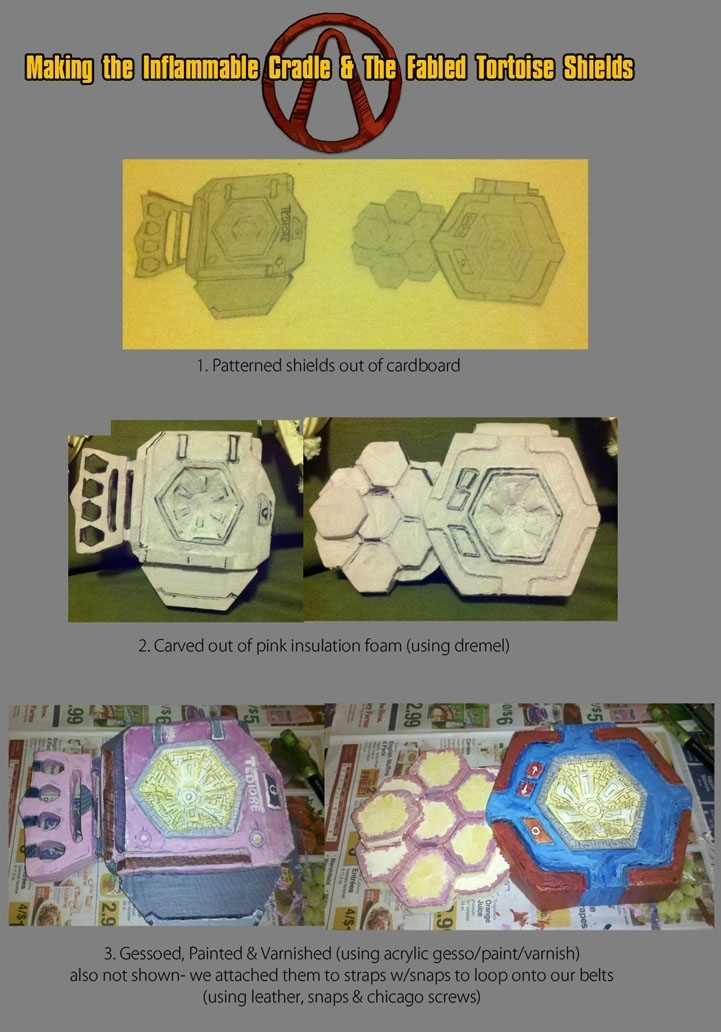
Shields (Inflammable Cradle & Fabled Tortoise):
Here's a quick and dirty tutorial on how we did the shields (which we added to our costumes along with The Orphanmaker Shotgun for Dragon Con 2013)